Welcome to the Artisan Design Team Blog Hop for October! The Artisan Design Team is a group of 20 demonstrators worldwide, chosen by Stampin’ Up! to share their creativity. For this hop, we are focusing on a theme of ‘grateful’.
This post’s title kind of says it all really. I will always be grateful for my time on the Artisan Design Team. It has been a total dream to work with some of the best designer demonstrators out there, and to have made new friends all over the world!
When asked what makes Stampin’ Up! for me – I always reply ‘the people’. I love the product, but for me, the people are what make this little business of mine all worthwhile. The customers, all of whom are now my friends. The staff from local and global home offices. The other demonstrators, both in the UK (can’t wait to meet up with lots in a few weeks) and all over the world as we get to know each other virtually. The people who follow the blog and leave kind comments (wink, wink!). I’m grateful for ALL OF YOU!
For this blog hop, I kept things kind of simple – and focused on another thing I’m grateful for – cake! I am always grateful for cake! I wish I could send you all a cake!
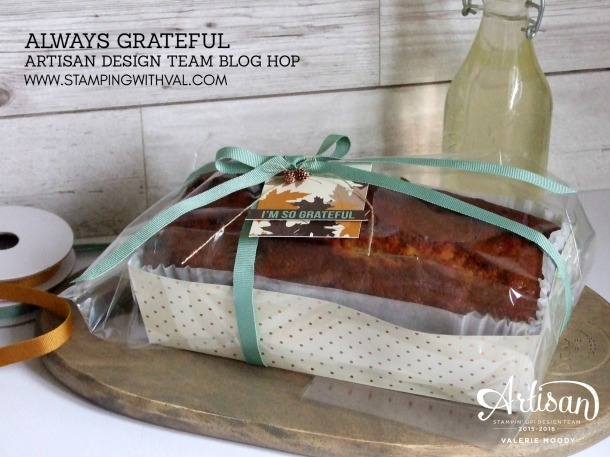
For this project, I created a ‘tray’ for my cake using the Stampin’ Up! Paisley & Posies Designer Series Paper. I simply used my baking tin as a kind of template to draw on the back of the card, then cut out and stick together.
I always bake my cakes in liners so they don’t stick to the tin, but they also help with minimising the grease staining onto the card tray too.
I then popped my cake into one of the new Gusseted Cellophane Bags then tied it all up with ribbon from the Ribbon Trio Pack in the Stampin’ Up! Autumn/Winter catalogue.

Finally, I created a tag using a 3×4 card from the All Year Long Project Life Card Collection. I added the sentiment, cut from another PL card, and finished it off with a couple of the cute Copper Mini Pinecones.
Let me know if you’d like more detail on how I created the ‘tray’ for my cake, and I’ll see what I can do.
If you live in the UK, and need any Stampin’ Up! supplies to make this, or any other project, you can get everything you need in my Online Shop. For this project, the items I used are listed below and you can click on any product image to add them to your shopping basket:
What I Used For This Project:
Many thanks for stopping by. Please hop onto the lovely Allison in Canada who I’m sure will be grateful to see you!
If you any reason, you find the blog hop breaks at some point, please bear with us and try again in a short while. We do our absolute best to have the hop correct at ‘go live’ time, but sometimes mistakes happen. We aim to fix them ASAP, but we are all at different points in our day (it’s 2am for me so I’m asleep, for example) so it might take us a little while to sort it depending on where the problem is.

Crafty Hugs, Val. XX


 Gusseted Cellophane Bags")
 Trio Pack")


